Fresh garage build, 5x10m, £10k

Soldato
OP
Joined
26 Aug 2003
Posts
24,262
I think I have to agree with Dublove - seal the joint between concrete and bearer with a good sealant - Stiksall adhesive and mastic is good - then paint concrete with quality waterproof paint.

I'm going to have to come up with something on this front, you're right. It's rained quite heavily and there is some ingress.

Gutters will help no doubt but I will have to do something. I'm keen to avoid 'sealing' the bearers completely because of rot, but I do want to keep water out. I will look at Stiksall and hopefully it will sort me out.

Frustrating - I didn't really know that the slab being the exact size of the bearer footprint was important, the product page etc are quite vague on that front and it never really occurred to me. DPC under the bearers, to be honest that just slipped my mind, and I wonder if there's some way I can finagle it in there. I very much doubt it though!

I might find that mastic and gutters fixes it, if not I will have to look into fitting a DPC skirt or similar. Obviously it's a garage not a garden room and it's direct on a concrete floor, so I suppose a 'cabin' with a floor would hide ingress and I'm just being precious. But I'd like to be able to get round it if possible.
 
Last edited:
Associate
Joined
18 Oct 2002
Posts
1,311
Location
Bristol
Ack I didn't look closely enough at your photos before I replied. I has assumed the bearers were inset somewhat under the outside face of the timber construction. See what you are saying, as any wall water runoff will still find a way in on top the bearer.
So my second suggestion is that it would be good to add a kind of skirting board ontop with a beveled top angle. Like: /|WALL. So covering the bearer, not touching the concrete, maybe 1/2- 3/4 inch gap. This skirt would come halfway up the first timber that is on top the bearer.
So do the whole bitumen thing as I said. Then attach the skirt, either a nice bead of paintable sealant on the top edge & paint it. Or paint then sealant bead. Honestly if you do that right it'll last for years.

p.s. the bearers will 'breathe' . you're only painting one face if them!
 
Soldato
Joined
5 Aug 2013
Posts
6,616
Location
Shropshire
My initial thoughts were when the bearers were first mentioned was is it too late to jack it up 6mm. Then push 5mm plastic spacers at 100mm intervals under the bearers- That gets wood off concrete then mastic up the outside - That will allow the bearers to dry out - as it is they might not sitting on damp concrete.
Also remember if rain is blowing into side of garage, gutters and skirt won't help -- it will still run down to the bearers.

Is there a option to cut the concrete flush with garage - A skirt would then overlap concrete/bearer join.

I am not even sure you will get rot on the bearers if you can seal the gap and add a skirt -

We are just trying to help with suggestions that might solve your problem - 10K is a lot of money and have to sort it out again in ten years time as you mentioned will be a total pain in the backside especially if bearers are fixed to bottom of garage sides.

Looking at my other reply I think mastic and a waterproof paint on the concrete will stop a lot of water but it might also be a temp fix..
Toolstation and Screwfix do stiksall
Good luck.

PS I have also just had a close look at bearers -I also thought they were just under the sides - so everything I just said stays but also fit the weather strips as suggested by Bublove.
I have fitted those to my shed as it sits back from the end of concrete slab.
Will get a picture tomorrow when it's lighter.
 
Last edited:
Soldato
OP
Joined
26 Aug 2003
Posts
24,262
Cheers guys. It's been dry today and they're still cold/damp but the water that made it's way in has basically all gone back out, so at least the fall on the edge is helping in that regard.

Good news is the bottom logs don't, and didn't, feel like they were wet (but the bearers did).

I think I would struggle to lift it at all as it's secured to the slab, I could try but I think I would just mash up the bearers? It's very well secured as well! The cabin is only secured to the bearers by 4 screws from memory but the bearers have screws about every 18 inches, maybe 2 feet I think. I might be able to lift it if I was replacing the bearers as I could make gaps in the bearers, support the cabin by going in these gaps, and probably cut the screws and replace the bearers with plastic/composite ones. I think this might be worth doing in a few years.

I'm fairly certain I can't cut the concrete unfortunately as it is reinforced, and I am 99% sure that the reinforcement is close enough to the edges that it would be exposed. I will look through my pictures to see if I can get a better idea.

I will definitely run some sealant down the join between bearers and concrete, which should hopefully stop the water actually running in, and I think you've won me over on the bitumen paint. I have heard the total opposite opinion elsewhere as well though, but what you say about it only being one face makes sense to me.

I'm not too concerned about water running down the bearers as I think they can cope with it, especially once the gutters are in as it should be a fair bit less, but I definitely don't want them sitting in a puddle which is basically what happened the other night. But I'll look into a skirt as it definitely makes sense. The bearers are basically flush with the logs. Some are ever so slightly inset and some ever so slightly protrude, about 1mm either way max, it's mostly flush.

Please don't think I don't want any help, it's just that a lot of this is obviously done already and can't be changed! Totally agree with you - I think it's run me about £7k? I want to make sure it lasts well.
 
Soldato
Joined
5 Aug 2013
Posts
6,616
Location
Shropshire
This is what I put round two sides of my shed as it was sitting back from edge of concrete - It's been up a few years now. I also put piece of DPM along bottom of the door - as you can see the concrete looks quite dry

414335220.jpg


This is what I call a skirt but using plastic DPM was a mistake as you can see it's curled up on itself - I need to take it off and try thick roofing felt - only need two sides here as I put summerhouse overhanging the other two sides. It still works to a degree as water runs down to a flat bit and drops off over the concrete.

414335221.jpg


After thinking about it I think your best bet is mastic bearer and concrete then paint the bearer and concrete with a good waterproof paint -wait and see how it goes. I think it will work
 
Soldato
OP
Joined
26 Aug 2003
Posts
24,262
After thinking about it I think your best bet is mastic bearer and concrete then paint the bearer and concrete with a good waterproof paint -wait and see how it goes. I think it will work

That's the plan, you guys have won me over.

Consumer unit's in now, conduit in, sockets placed, and the lighting's working. The power's not run all the way around yet as we ran out of time.

Running the cables in 20mm conduit is an absolute **** of a job! I don't know if it's because it goes through the rafters so we're not able to straighten the run out while we put it together, but... I hate it, it's the worst.

AeH1MTK.jpg

m30vFpV.jpg

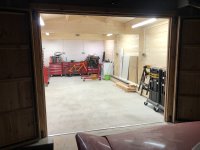
Need to get that washing machine out! Haven't got round to taking the other one out of the house that was here when we moved in, weird 80's kitchen and it's a bit trapped in there.
 
Soldato
Joined
5 Aug 2013
Posts
6,616
Location
Shropshire
That's one happy looking car :D Floor certainly look dry now.

Have you got one of those coils of thin plastic fish tape - ideal for pushing up conduit - You want to try that standing on top of a ladder.
 
Soldato
OP
Joined
26 Aug 2003
Posts
24,262
Have you got one of those coils of thin plastic fish tape - ideal for pushing up conduit - You want to try that standing on top of a ladder.

I was hating my life honestly! I’ll take a look and get some fish tape.

It just felt like there was too much cable and too many twists and turns, the main bit we still have to run is like a big u shape so I think we’re going to take all the conduit down, thread it on like a chain and then put it all up, if that makes sense. We have definitely not got the tekkers at this! But we’ll get there I’m sure... my dads actually a competent electrician (kitchen fitter) but when he runs conduit for himself he’s lazy and uses the stuff where the front snaps on, but silly ******** over here wanted it mega neat and tidy! I’m sure it will be worth it...
 
Soldato
Joined
5 Aug 2013
Posts
6,616
Location
Shropshire
Rule number one is !! when putting conduit or ducting in always put a draw string in as you go - One other thing you might try is get a small food bag with handles on - tie some string to the bag and push bag up the conduit - go to the other end and put vacuum hose over the conduit and in theory it should suck the bag through. - Just look on youtube. :D

PS tie string to the handles of the bag
 
Soldato
OP
Joined
26 Aug 2003
Posts
24,262
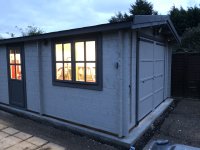
Bit more progress, quite a lot actually. The electrics and lighting are all completed now. The whole exterior is now painted (apart from one window frame which I'm going to do very soon!) Only one coat but it'll do for now - I will do the second coat section by section when I've time.

Got a PIR light on the front, two exterior lights on the side with an outside switch. Outside plug sockets towards the back for mowing the lawn and so on.

B8lxrVR.jpg

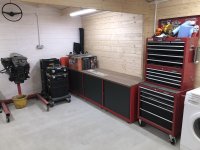
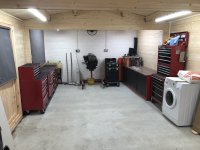
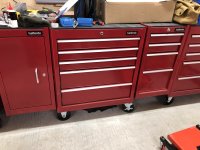
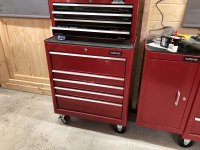
Things are calming down on the house front too, and it was time to sort out the state of the inside now it's 'complete'. I had a move about of some stuff and settled for now at least on the position of some bits, so I got my cabinets in place, levelled them out properly and used a bit of worktop that won't fit in the new 'office' room at this place. I reckon I will probably put the roll cabs back along the back wall though.

The mad tidy up continued, I had a standalone shelving unit that's been in the shed but it was a bit crap. I wanted something sturdier, bigger, and if possible red... settled on a Clarke one from Machine Mart that I'm actually dead impressed with. The boltless fixing holes are hidden on the insides and the cross parts have a stamped profile to them so it's pretty sturdy, nice laminated shelves as well. Got the bike off the floor too. The garage is finished to an extent now and it's a big relief, really chuffed with how it all turned out. Plenty of bits to do still like weatherproofing the bearers and so on but all the real hard work is done. Got to get that ****ing washing machine into the house but the stupid 80s kitchen means it's going to be a pain in the neck. Running out of excuses now!

El8h74h.jpg

pyiTMkG.jpg

Oe7rRfO.jpg

View attachment TgX1GxM.jpg
 
Soldato
Joined
5 Aug 2013
Posts
6,616
Location
Shropshire
Neat - real neat -- you have done a good job - I like the fact it's really light and bright.

You could do with a man chair though - a heater and mechanics specialised magazines if you know what I mean. :D
 
Soldato
OP
Joined
26 Aug 2003
Posts
24,262
Looks great, seems a lot bigger now you have stuff in there.

Did you seal the concrete floor or any plans to do so?

As to how long you should wait I’ve heard everything from a month, to a week per inch thick, to a month per inch thick! I think I’ll probably just seal and paint come spring.

New concrete is so dusty it’s outrageous, when I tidy up I get stuck in an endless loop of sweeping! It just keeps coming.
 
Soldato
OP
Joined
26 Aug 2003
Posts
24,262
Nice garage! On a side note, MX5 engine going in the car? :p

Yeah that's the plan.

Place is a pigsty at the moment, I've moved 90% of my stuff in from the shed and it's all everywhere while I decide how to put everything in :/ Got some socket organisers and whatnot on the way because the trays I'm using at the moment are for shallow drawers and I'm moving most of my stuff to the base cabs.

Also I want my sockets, including deeps, in the top drawer of one stood up in racks. The cabinets I've bought have shallow top drawers so I decided to investigate. Turns out the cabinets have holes drilled such that it's possible to swap the drawers around so I got my drill and my rivet gun out.

Standard layout:

aMBBJqE.jpg

Layout for sockets in top drawer:

eGW4p0l.jpg

I'd be tempted to make one have all big drawers and one have all small drawers but the layout wouldn't work, there's basically room for 7 small drawers so there'd be an odd one. :(
 
Associate
Joined
18 Oct 2002
Posts
2,159
Location
South, Scotland
Amazing, this is something that I want to do as well for my back garden as well in time, I want to put in at least that size of a shed so that I can try my hand again at wood working so I can build stuff.

I also want to try making rings from rare materials after seeing one guy making made rings out of stuff like superconductor material that has copper strands running through it, they come from old hospital MRI's.

Add Power, Data, Water and Drainage as I would like to put a hot tub at the back of it by extending the profile of the shed roof.

Anyone know if you could run a set of solar panels off the roof as well, I cant do it in the place I'm in as its a ground flat with an upstairs owner.

I will be following this keenly, keep up the good work friend! :D:cool:
 
Associate
Joined
12 Jun 2018
Posts
41
Love this - pretty much decided to copy you in my new house. Need a garage ASAP after we get the keys and figure I can get the slab laid, order this and have a garage pretty darn quick!

Quick Q - how much osmo paint did you use? 2 coats?

And also, is the footprint exactly 4m x 7.5m? Keen to get base exact.
 
Soldato
OP
Joined
26 Aug 2003
Posts
24,262
Love this - pretty much decided to copy you in my new house. Need a garage ASAP after we get the keys and figure I can get the slab laid, order this and have a garage pretty darn quick!

Quick Q - how much osmo paint did you use? 2 coats?

And also, is the footprint exactly 4m x 7.5m? Keen to get base exact.

I’ve still only actually put one coat on quite a lot of it - need to see to that before winter if I can. Looks much better where there is two coats imo.

The footprint is slightly smaller, I do wish I had found the measurements and made the slab more exact but you live and learn and I’ve had no problems yet, I sealed around the bottom which seems to have worked fine for rain. My father in law did point a sprinkler at the building for a few hours recently and I opened the door to find a puddle though :rolleyes:

The plans on quick-gardens website do list the base size I think. The 4.5x7 is either the total size of the building including the roof, or just including the sticky out bits on the walls, I forget which.

still happy with it after about a year.
 
Associate
Joined
12 Jun 2018
Posts
41
I’ve still only actually put one coat on quite a lot of it - need to see to that before winter if I can. Looks much better where there is two coats imo.

The footprint is slightly smaller, I do wish I had found the measurements and made the slab more exact but you live and learn and I’ve had no problems yet, I sealed around the bottom which seems to have worked fine for rain. My father in law did point a sprinkler at the building for a few hours recently and I opened the door to find a puddle though :rolleyes:

The plans on quick-gardens website do list the base size I think. The 4.5x7 is either the total size of the building including the roof, or just including the sticky out bits on the walls, I forget which.

still happy with it after about a year.


Brill - and I understand the walls are flippable? I would want the side door and windows on the opposite side for my plot.
 
Back
Top Bottom