1st adventure into watercooling please help!

Associate
Joined
24 Jun 2003
Posts
1,627
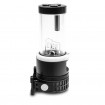
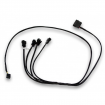
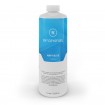
So my 9600KF had just gotten fried after my H100i AIO water unit stopped working , ( one pipe hot the other cold ) so looked like air somehow.. anyways i have decided to purchase and install a custom water loop , one that can be future proofed when i change cpu's and gpu.
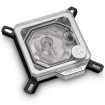
the loop i want will be for cooling the cpu ( socket LGA 1151 & gpu 1080 ti , but will be upgrading to the likes of the 3080 ti or 3080 super when they get released ), and who knows in the future MAYBE the memory.
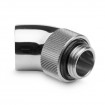
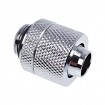
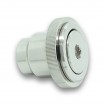
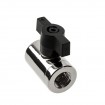
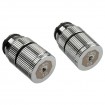
So ive no idea what fittings etc to use i want something that will be upgradeable and last , but dont want it gold plated or the price to reflect this :)
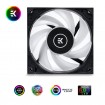
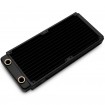
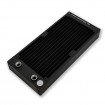
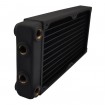
my case is pretty big approximately 430 x 430 mm internally ( 500 x 500 mm externally ) and it can fit a twin fan radiator in the top of the case or/and a triple fan radiator in the front of the case.
 
Associate
Joined
8 Jan 2020
Posts
67
I started with one of the EK Kits which has now been superseded by the Classic Kit D-RGBP360. The single 360x40mm thickness radiator happily cooled my 3900X CPU and RTX 2080TI GPU I later added an additional 360x30mm thickness radiator and adjusted fan and water pump speeds around the system which resulted in an additional 1-2 degrees celsius drop in delta temps, 6 deg C drop in CPU and 10 degrees drop in GPU temps while running Heaven Benchmark tests. The kit uses flexible hosing so is easy enough to fit but still worth putting thought into how you want to route it through your system. You will still need to add a drain valve to that kit. Link to my system https://www.overclockers.co.uk/foru...-case-gallery.17305236/page-142#post-33545132
 
Associate
OP
Joined
24 Jun 2003
Posts
1,627
I started with one of the EK Kits which has now been superseded by the Classic Kit D-RGBP360. The single 360x40mm thickness radiator happily cooled my 3900X CPU and RTX 2080TI GPU I later added an additional 360x30mm thickness radiator and adjusted fan and water pump speeds around the system which resulted in an additional 1-2 degrees celsius drop in delta temps, 6 deg C drop in CPU and 10 degrees drop in GPU temps while running Heaven Benchmark tests. The kit uses flexible hosing so is easy enough to fit but still worth putting thought into how you want to route it through your system. You will still need to add a drain valve to that kit. Link to my system https://www.overclockers.co.uk/foru...-case-gallery.17305236/page-142#post-33545132

Nice system :)

Ive been reading a bit more since posting and i am thinking on getting this pump
https://www.overclockers.co.uk/ek-w...gb-pump-reservoir-combo-acetal-wc-9ws-ek.html ( due to its 1500 L/h )or would that be like a power washer when just used with a one triple radiator and cpu block ( i plan down the line to get a gpu block as well and a double radiator as well )
Also this radiator to be mounted vertically in the front of the case : https://www.overclockers.co.uk/ek-w...eam-xe-360-triple-fan-radiator-wc-842-ek.html
and if temperatures were not suitable then i could have the option to add a double radiator on the top of the case but it would have to be a slim one : https://www.overclockers.co.uk/ek-w...sic-240-slim-dual-fan-radiator-wc-9rz-ek.html

if i went this route would the slim double on the top or the thick triple in the front provide better cooling?
Also i take it the radiators do not come with the fans ?
 
Associate
Joined
8 Jan 2020
Posts
67
On my setup, I run 6 fans on the https://www.overclockers.co.uk/ek-w...lassic-360-triple-fan-radiator-wc-9s3-ek.html which is 45mm thickness front radiator in push-pull configuration and on the top radiator https://www.overclockers.co.uk/ek-w...c-360-slim-triple-fan-radiator-wc-9s0-ek.html I run 3 fans below it exhausting the internal case air out through the 27mm thickness radiator. I have a flow meter which you can see in the image and I have never gone above 3.2 litres/min (<200 litres/hour) when gaming and running Heaven benchmark/3D mark stressing the system. But this is all down to how I have configured the ramping speeds on the fans and the pump, the static pressure the fans produce etc. The radiator you linked is a 60mm thickness, so you will need to run 6 fans in push-pull configuration and as a fan is around 25mm thick, you are talking 110mm clearance required at the front of your case. Personally, I think my current watercooling system would have no problem running an RTX 3080/3090 and keep the temps of my CPU and GPU around 50 deg C while gaming with a bit of tweaking my ramping curves. So if I were you, thinking about adding to the water cooling system as and when you get your GPU, I would get the 45mm radiator for the front and 3 high static pressure fans to fit to it and cool your CPU with that for now. When you get your GPU and introduce that to the loop play around with your pump and fan speeds and record their settings, delta temps (coolant-ambient), CPU and GPU temps while running repetitive benchmarking tests. You will be surprised what can be achieved with that single radiator. Once you have logged that data if you want to lower temps more buy another 3 fans and fit them to the front rad so in push-pull configuration and repeat the benchmark testing and logging. If still not happy with temps then get your top radiator, take 3 of the fans of the front radiator and apply two of them to the top radiator and repeat your testing. Finally, if required after all that buy another two fans to refit the additional front three in push-pull configuration. Lots of fun testing and logging, took me a couple of months over weekends/evenings to find my optimum settings. One other thing, your mobo, does it have headers for temp sensors otherwise you will need a controller card.
 
Associate
OP
Joined
24 Jun 2003
Posts
1,627
@George Hudson Thanks for the info , made me go measure my case again , and nope the tripple with push and pull fans wont give me room for the connections on the radiator ( i'm assuming the radiator has to be mounted with the connection holes at the bottom end of the radiator ) ?? or you would end up with circulation probs ?
 
Associate
OP
Joined
24 Jun 2003
Posts
1,627
I have the inlet and outlets at the top of the radiator in the case. You wont have circulation problems, just makes it awkward to completely drain the system.
Thanks george for the heads up , ive just been measuring up the case and looking at all the selections/sizes of the EK radiators , i never thought on doing a push pull configuration before , but now you mentioned it i have measured up and both the front and the top i will only be able to fit in double radiators , if i do this then in the front i i have the room to install a 280x130x38 mm rad with 4 fans ( push n pull ) and on the top i can fit in a 273x120x27 with just two fans pushing ?? or would pulling be better on the top?
also my MB is an Gigabyte Z390 AORUS ELITE so not sure about the fans
also with the fans do i just need two cpu headers 1 for each radiator then use the likes of one of these to split it to the two or four fans
EDIT : this https://www.overclockers.co.uk/ek-water-blocks-ek-cable-y-splitter-3-fan-10cm-wc-9ak-ek.html

Edit 2 , ive just downloaded my MB manual : https://download.gigabyte.com/FileList/Manual/mb_manual_z390-aorus-elite_v3_e.pdf
and in it i seen it said under internal connections :

1 x CPU fan header
1 x water cooling CPU fan header
3 x system fan/water cooling pump headers

and in the manual under Bios settings there is :

#################################################

Fan Speed Control Allows you to determine whether to enable the fan speed control function and adjust the fan speed.
Normal Allows the fan to run at different speeds according to the temperature. You can adjust the fan speed with System Information Viewer based on your system requirements. (Default) Silent Allows the fan to run at slow speeds. Manual Allows you to control the fan speed in the curve graph.
Full Speed Allows the fan to run at full speeds.
Fan Control Use Temperature Input Allows you to select the reference temperature for fan speed control.
Temperature Interval Allows you to select the temperature interval for fan speed change.
Fan/Pump Control Mode
Auto Lets the BIOS automatically detect the type of fan/pump installed and sets the optimal control mode. (Default)
Voltage Voltage mode is recommended for a 3-pin fan/pump.
PWM PWM mode is recommended for a 4-pin fan/pump.
Fan/Pump Stop Enables or disables the fan/pump stop function. You can set the temperature limit using the temperature curve. The fan or pump stops operation when the temperature is lower than the limit. (Default: Disabled

####################################################


will i still need a fan controller or is that got the right connections to run the fans
 
Last edited:
Associate
Joined
13 Jun 2016
Posts
1,499
Location
UK
Personally I would start with a small loop and work from there, but that was just how I preferred doing it. I put the CPU in the loop first of all and then added water cooled my graphics card later.

I'd recommend soft tubing unless you are particularly good at DIY with other plumbing etc. A radiator, compression fittings, soft tubing, tube cutters, pump, reservoir, coolant, drain valve and fill bottle are all must haves IMO. Also, worth having a few extra fittings as spares.

I personally found it easier to go with a D5 pump that didn't take a signal from the PWM header to control the pump speed - the one I have has a dial on the underneath and you just set the pump speed manually. There is a cable for connecting to a waterpump header on the motherboard, but that's just to detect pump failure.

I wouldn't go near anything that's got aluminium in it, such as some of the ready kits. Copper or nickel plated copper.
 
Associate
Joined
8 Jan 2020
Posts
67
You wont need a separate fan controller as you have all the headers you require on the mobo. Your mobo bios will be very similar to mine as it is an Aorus master. For each of the fan headers you can define which temperature source you want to use. There are several sensors around the mobo. On my mobo there is also a connector for an external temp sensor which I have in the water cooling line, (but you don't have that capability) and I can set my fan ramping curves based on the coolant fluid temperature. This is not essential, but basing them on CPU temp where there is quite a bit of fluctuation you may find your fans constantly ramping up and down chasing the temps which you may find annoying, but again this is all down to the ramping curve you setup. If you wanted to monitor fluid temp and ambient temp you would need a separate controller card and it would probably have another set of fan headers also. These are more programmable when it comes to setting up fan/pump curves as you can base them on delta temps also. Regarding the number of fan headers and number of fans you connect to each using splitters. You have to be careful on the amount of power drawn by the fans. You can get splitters whereby each of the fans takes the 5v power from a molex connector and there PWM all taken from the same mobo fan header. Here is such a cable https://www.overclockers.co.uk/ek-water-blocks-ek-cable-splitter-4-fan-pwm-extended-wc-9cq-ek.html
 
Associate
OP
Joined
24 Jun 2003
Posts
1,627
Personally I would start with a small loop and work from there, but that was just how I preferred doing it. I put the CPU in the loop first of all and then added water cooled my graphics card later.

I'd recommend soft tubing unless you are particularly good at DIY with other plumbing etc. A radiator, compression fittings, soft tubing, tube cutters, pump, reservoir, coolant, drain valve and fill bottle are all must haves IMO. Also, worth having a few extra fittings as spares.

I personally found it easier to go with a D5 pump that didn't take a signal from the PWM header to control the pump speed - the one I have has a dial on the underneath and you just set the pump speed manually. There is a cable for connecting to a waterpump header on the motherboard, but that's just to detect pump failure.

I wouldn't go near anything that's got aluminium in it, such as some of the ready kits. Copper or nickel plated copper.
Thanks for the input , yes i will just be starting of with the cpu as atm my gpu is a 1080ti , but next year i will change it to a 3080 series so ill get a block then for it.
Did you mean for me to avoid "Copper or nickel plated copper" or for me to stick to that?
thanks
 
Associate
OP
Joined
24 Jun 2003
Posts
1,627
You wont need a separate fan controller as you have all the headers you require on the mobo. Your mobo bios will be very similar to mine as it is an Aorus master. For each of the fan headers you can define which temperature source you want to use. There are several sensors around the mobo. On my mobo there is also a connector for an external temp sensor which I have in the water cooling line, (but you don't have that capability) and I can set my fan ramping curves based on the coolant fluid temperature. This is not essential, but basing them on CPU temp where there is quite a bit of fluctuation you may find your fans constantly ramping up and down chasing the temps which you may find annoying, but again this is all down to the ramping curve you setup. If you wanted to monitor fluid temp and ambient temp you would need a separate controller card and it would probably have another set of fan headers also. These are more programmable when it comes to setting up fan/pump curves as you can base them on delta temps also. Regarding the number of fan headers and number of fans you connect to each using splitters. You have to be careful on the amount of power drawn by the fans. You can get splitters whereby each of the fans takes the 5v power from a molex connector and there PWM all taken from the same mobo fan header. Here is such a cable https://www.overclockers.co.uk/ek-water-blocks-ek-cable-splitter-4-fan-pwm-extended-wc-9cq-ek.html
Thats good to hear about the MB , also thanks for linking that cable :)
here is roughly what i have in my basket so far , i'm unsure on the fittings as to how many of each i will require, but i was unable to find any chrome colour 90 degree bends in stock, just the 45 degree ones.


My basket at Overclockers UK:


Total: £586.16 (includes shipping: £10.50)

Is the CPU block a decent choice or is there better options? that doesn't involve me selling an eye.
Now i would really prefer some 90 degree bends as apposed to the 45 degree ones , in my basket i also have two types of drains , is that just a case of preference or is one better than the other?
that temperature lead is that compatible with my MB / reservoir ?
Do i need the fill plug or does the reservoir that i linked have one already on it?
What else am i missing ?​
 
Last edited:
Associate
Joined
13 Jun 2016
Posts
1,499
Location
UK
Thanks for clarifying that man :)
No probs. The reason for that is the majority of parts you will buy now or in the future wil be copper or nickel plated copper. If you buy a kit from somewhere like EKWB, some of their kits contain aluminium, which you really don't want to mix with anything copper. So it's easiest just to start with copper/nickel plated copper parts from the outset :)

In terms of the shopping list above, I've no experience of EKWB radiators but I would again try for one with copper chambers - they are brass. I don't think that's the end of the world from a galvanic corrosion point of view, but you might like to look at radiators by Alphacool, XSPC or Hardware Labs.

One thing I really would recommend is that you add this to your shopping list:

My basket at Overclockers UK:
Total: £15.65 (includes shipping: £8.70)

You can then fill the reservoir with coolant directly, negating the need for that extra fill port - unless you especially want one! Although some radiators have multiple ports, so if you have a lot of patience and have it as the highest component in the system, you could VERY SLOWLY fill the system from one of the extra fill ports. For example, one like this:

My basket at Overclockers UK:
Total: £62.89 (includes shipping: £9.90)

You will also need one of these:

My basket at Overclockers UK:
Total: £4.73 (includes shipping: £2.74)

This is so you can power the pump with everything in your system, but without the rest of your components getting power. You can do this so you can prime the system with coolant, being careful to never let it run dry as you fill the system up. This little connector just jumpers a couple of the power supply pins together; you can do the same with a paperclip or similar but for the sake of two quid I'd buy the bridging plug!
 
Associate
OP
Joined
24 Jun 2003
Posts
1,627
No probs. The reason for that is the majority of parts you will buy now or in the future wil be copper or nickel plated copper. If you buy a kit from somewhere like EKWB, some of their kits contain aluminium, which you really don't want to mix with anything copper. So it's easiest just to start with copper/nickel plated copper parts from the outset :)

In terms of the shopping list above, I've no experience of EKWB radiators but I would again try for one with copper chambers - they are brass. I don't think that's the end of the world from a galvanic corrosion point of view, but you might like to look at radiators by Alphacool, XSPC or Hardware Labs.

One thing I really would recommend is that you add this to your shopping list:

My basket at Overclockers UK:
Total: £15.65 (includes shipping: £8.70)

You can then fill the reservoir with coolant directly, negating the need for that extra fill port - unless you especially want one! Although some radiators have multiple ports, so if you have a lot of patience and have it as the highest component in the system, you could VERY SLOWLY fill the system from one of the extra fill ports. For example, one like this:

My basket at Overclockers UK:
Total: £62.89 (includes shipping: £9.90)

You will also need one of these:

My basket at Overclockers UK:
Total: £4.73 (includes shipping: £2.74)

This is so you can power the pump with everything in your system, but without the rest of your components getting power. You can do this so you can prime the system with coolant, being careful to never let it run dry as you fill the system up. This little connector just jumpers a couple of the power supply pins together; you can do the same with a paperclip or similar but for the sake of two quid I'd buy the bridging plug!

Thanks for the info about the radiators , never knew that i just thought it was the size :) , yip will add one of them bottles and jumpers to the basket, off now to look at the rad sizes :)
one other thing is that due to space constraints ive changed the pump/reservoir to a smaller one ( physical size and L/H , down from 1500 L/H to 1000 L/H )

https://www.overclockers.co.uk/ek-w...rgb-pump-reservoir-combo-plexi-wc-9yt-ek.html
unless the previous pump i had in my basket can be mounted horizontally ??
 
Soldato
Joined
20 Dec 2006
Posts
3,756
Consider Corsair rads, I got my first.one a 140mm very well.made, made by HWlabs. Good pricing.

My other rad is an xspc that I've been happy with for many years
 
Back
Top Bottom