EK Quantum Kinetic FLT Evolv'd

Soldato
OP
Joined
22 May 2010
Posts
11,879
Location
Minibotpc
Front panel is on! Subtle Phanteks Neon Strips added

Final Lian Li SL140 Fan to replace the 120mm at the bottom for more airflow covering a wider space.

Ideally i want to mount a slim 120mm fan on the top panel however there is literally no room for it to go without interfering with the cables... I'll figure out a way.


0JEi7QO.jpg

KlDVaQE.jpg

3TsqCXF.jpg

vtJuf2G.jpg
 
Soldato
OP
Joined
22 May 2010
Posts
11,879
Location
Minibotpc
Changed the sensor panel components for something else, needed something to tinker with. Messed with the colour scheme and i think i almost have it perfect now. Has a really nice and immersive cyberpunk feel to it now.

Still trying to figure out a way to get a flow meter and temp sensor to fit into all of this. Might not be able to get it in for the gpu side but defo should be able to on the cpu side at least as its the side i see.

kYxSAaQ.jpg

aLuYigK.jpg

sXidtwI.jpg

0ilvjBe.jpg

xt1Fjjk.jpg
 
Soldato
OP
Joined
22 May 2010
Posts
11,879
Location
Minibotpc
Panel Updates,


with most of the internals almost sorted, i'm now starting on the back and front panels for a more themed look. Originally i was going to wrap or spray them in a solid colour but after much deliberation i decided to go with some cyberpunk related artwork.

The panel is long.. ridiculously long around 650mm to be precise so any single artwork was never gonna cover it. This is where i got a good friend of mine to combine 2 images to meld into one. The rest of the empty space will be filled with his own drawing to match the theme, more than likely Japanese themed clouds with a neon effect.

The artwork will be printed on vehicle grade wrap to allow for heating and stretching to fit over some of the edges.

Front panel im still working on what to do with that many cutouts, it's difficult to get a design to suit it.


The 2 images we're going to use but will modify and create something more unique to make it his own:

1F5ix3L.jpg


Initial stages of combining the 2 images:

8JQNlDI.jpg


More work on combining the 2 images with the word "Ronin" added as a placeholder for now:

u8vzJn0.jpg
 
Soldato
OP
Joined
22 May 2010
Posts
11,879
Location
Minibotpc
The panel is finally on! From draft to design to the final finish!

qS3jVvG.gif


MO-RA3 360LT is on the way from OCUK, be a few weeks still but can't wait to get my hands on it!
 
Associate
Joined
30 Mar 2017
Posts
856
That's amazing Jay.

I love the pass-through for the quick disconnects.

Really, makes it two separate pieces.

Bet you will get some serious performance with the bigger external rad.

Be interested to see what the results are.

I keep seeing cases I want to build in next.

Would really like to get the Corsair 7000D.

Great effort!
 
Soldato
OP
Joined
22 May 2010
Posts
11,879
Location
Minibotpc
That's amazing Jay.

I love the pass-through for the quick disconnects.

Really, makes it two separate pieces.

Bet you will get some serious performance with the bigger external rad.

Be interested to see what the results are.

I keep seeing cases I want to build in next.

Would really like to get the Corsair 7000D.

Great effort!
I'm hoping so too, im not expecting huge temp differences but with the ability to run lower speed fans too will be a bonus on its own having an ultra quiet system.

Seriously though the rear panel came out way better than i expected, i love it so much lol.

Don't ponder too long, just do it. Lifes too short to ponder, go out and do what you want :D.
 
Soldato
OP
Joined
22 May 2010
Posts
11,879
Location
Minibotpc
Finally got my Mo-RA3 yesterday after 2 months of searching! OCUK did me a solid on getting me this from caseking in such a short time. Such a beast of a radiator and my god its heavy! The wife answered the door and the DPD guy gave it her and she caught it with 1 hand not realising how heavy it was and nearly dropped it ! Got it all built up last night and works great, running basically ideal fan speed 600rpm and still maintaining 44c gpu core temp while playing flight sim. My old setup would require at least 1500rpm fan speed to maintain this temp, such a difference. Not tested it further yet as i finished quite late.

Just a slight issue with one of my QD's, its rattling when there's flow going through it so i think there's either something trapped in it and rattling or its fault. The locking mechanism is a little stiff as well, doesn't pull back smoothly like it use to. Anyone experienced this with QD's?

Hq3G81o.jpg


G14w2fp.jpg

F0lDNi4.jpg
 
Last edited:
Soldato
OP
Joined
22 May 2010
Posts
11,879
Location
Minibotpc
Anybody knows how to connect the flt 240 led to a 12v header???
You can't, the FLT 240 LED's are 5v argb. A 12v motherboard header will burn out the 5v LED's if you plug them in. Better off buying an RGB controller if your motherboard doesn't have a 5v header.

What board is it?
 
Associate
Joined
13 Feb 2012
Posts
156
Location
Gravesend Kent
It's 2020 and i've done nothing but tinker with this machine, lost count how many times i've rebuilt it and swapped out parts. But as usual im browsing through the ocuk website and the new quantum block reservoirs catch my attention. I do some digging and look at some builds and figure, you know what i could make my rig even cleaner and simplistic. So here we go again, another rebuild thread...

Parts used:

My basket at Overclockers UK:
Total: £345.44 (includes shipping: £10.50)


Everything else i've had previously so was reused in this build.


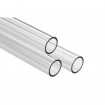
One thing i learnt through this rebuild, the corsair hydro x tubing is much harder than the usual PETG stuff im use to. I didn't see this when i bought it and thought it was standard PETG but turns out its PMMA which is an acrylic/poly carbonate plastic so had to use a saw to cut it. You can imagine my face when i first tried to cut it with a new tube cutter lol!

I do love this tubing way more though, its much more resistant to scratches and looks clearer. Would definitely be using this again over PETG.


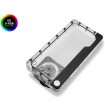
The EK Quantum Kinetic FLT 240 - First impressions...
It's very solid, very good quality and weighty! The machining is top notch and the material itself is very scratch resistant as i found out when i dropped a few heavy fittings on it by accident! It comes with all the necessary mounting hardware and an allen key tool to remove the G1/4 plugs. I got the FLT version with the D5/DDC mount at the back. As standard, the ports on the face are plugged leaving 2 open ports at the bottom. I feel like the ports at the bottom should have been plugged instead, its very easy to miss and forget that there's actually ports down there.. just something to look out for. The block also comes with a built in LED strip which i have yet to test out but does fit on a standard 5v ARGB header.

One thing i did notice and that i always do with EK blocks is testing how tight the screws are in. In this instance the screws were loose. If i was to fill this res block, it probably would have leaked eventually if not straight away as the vibration from the pump. I would 100% you check all your blocks from EK when you first get them to make sure they screws are in tight!


As usual, a couple of pictures of the process and a short description.

Getting the EK Quantum Kinetic mounted with the D5 pump mounted at the rear. Getting all this mounted together with the fan at the back for intake was an absolute ball ache to do! The standard screws that came with the kit is not long enough, i had to dig out some old screws i had to make this all work. Also note to remember to block off the bottom ports on the res block before you install it. Last thing you want is to fill it and have all the coolant fall out the bottom!

6gbWvaD.jpg

J6rtXlP.jpg


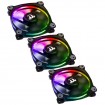
New fans, Thermaltake Riing! Came with the controller which i strategically placed under the res for easy access.

omyxHfI.jpg


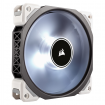
ML120's at the top, nice crisp but not over the top bright White led fans

n4r22tp.jpg


This bitspower EF Summit that i've had for a millennia now...

f28cM5w.jpg


GPU installed with the riser kit from Phanteks. There is no room underneath, the verti mount sits on the fans shroud...

uaY21qq.jpg

Jxs7atL.jpg


The first bend! Used a mixture of tools and free hand to get the bends right, took a few attempts but PMMA is quite easy to work with provided you get it hot enough. Minimizing those angled fittings and adding more complex bends, something my last build lacked.

m2aR4kd.jpg

Gnrx4VK.jpg

ndW8sED.jpg


Finally getting the last of the piping in but need to cut some down to fit a flow meter inbetween. Also not 100% happy with the top bend, its slightly sacking downwards. OCD kicks in, will need to adjust it.

jS7Ez5S.jpg

Sv7m0KQ.jpg


More to come later!

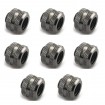
Another thing to note, i found PMMA tubing fits much tighter in XSPC 14mm fittings. Probably due to the fact that it was designed for PETG and not PMMA. They do fit but takes a lot more force to get them in, really have to twist and wiggle them to get them past the orings even with a nice chamfer edge.

that’s not good reading the last bit about pmma as I’ve got the xspc triple seal fittings and 14mm tubing so looking forward to raw hands :cry:
 
Soldato
OP
Joined
22 May 2010
Posts
11,879
Location
Minibotpc
that’s not good reading the last bit about pmma as I’ve got the xspc triple seal fittings and 14mm tubing so looking forward to raw hands :cry:
My only advice to you would be to lube up the tubing or Orings before you try and insert it or you're gonna chew up your orings.

I actually ended up with bigger issues in the long run where bits of oring ended up clogging my blocks!
 
Associate
Joined
22 Aug 2003
Posts
1,413
Jay85
I owe you a big thanks
I am currently building myself a new custom loop PC and been having serious issues with my FLT 240 pump/res combo leaking when it first arrived i air tested it with the ek leak tester kit (great bit of kit) no leaks so thought i would test the pump as well before installation

so filled it with distilled water and ran it for half an hour
so far every thing going to plan

so then installed it along with the other items including the tubing - it started then popping off one of my tubes when i air tested it so - I changed one of the 16mm fittings it was slowly leaking all of a sudden and after various attempts to solve the issue and not getting anywhere fast the whole thing would not let me add air just leaking non stop

so i took out all the tubing and started testing yet again and now my FLT wont hold air at all and i can here it hissing!!

talk about what a nightmare this is turning into
must add i never blow the pressure past 5 bar on the air tester and have been very gentle as i can with it

and could not get any air into it - so spent most of yesterday evening and nearly up all night stressing about my next move
so started reading various Google searches about problems with the FLT 240mm and this thread came up

and early in this thread you got my brains cells twiching when you said the little allan screws on yours were not tight - so had not even thought that they might be the problem so out comes the little allan key and just like you mention it needed had a quarter of a turn on each one to tighten them and not knowing if this was the main problem or not i then again air tested it
Lo and behold the damned this is now not leaking still sat here holding 5 bars after 40 minutes
pretty poor form for EK to send out products that are not tightened properly

so thank you for mentioning this in your thread as i was going to RMA it back EK had i not found a solution now going to change one of the fittings and try a new bit of tubing on the run that wants to keep popping off i guess i made a mistake buying the tubing from different manuafacturers
 
Soldato
OP
Joined
22 May 2010
Posts
11,879
Location
Minibotpc
Jay85
I owe you a big thanks
I am currently building myself a new custom loop PC and been having serious issues with my FLT 240 pump/res combo leaking when it first arrived i air tested it with the ek leak tester kit (great bit of kit) no leaks so thought i would test the pump as well before installation

so filled it with distilled water and ran it for half an hour
so far every thing going to plan

so then installed it along with the other items including the tubing - it started then popping off one of my tubes when i air tested it so - I changed one of the 16mm fittings it was slowly leaking all of a sudden and after various attempts to solve the issue and not getting anywhere fast the whole thing would not let me add air just leaking non stop

so i took out all the tubing and started testing yet again and now my FLT wont hold air at all and i can here it hissing!!

talk about what a nightmare this is turning into
must add i never blow the pressure past 5 bar on the air tester and have been very gentle as i can with it

and could not get any air into it - so spent most of yesterday evening and nearly up all night stressing about my next move
so started reading various Google searches about problems with the FLT 240mm and this thread came up

and early in this thread you got my brains cells twiching when you said the little allan screws on yours were not tight - so had not even thought that they might be the problem so out comes the little allan key and just like you mention it needed had a quarter of a turn on each one to tighten them and not knowing if this was the main problem or not i then again air tested it
Lo and behold the damned this is now not leaking still sat here holding 5 bars after 40 minutes
pretty poor form for EK to send out products that are not tightened properly

so thank you for mentioning this in your thread as i was going to RMA it back EK had i not found a solution now going to change one of the fittings and try a new bit of tubing on the run that wants to keep popping off i guess i made a mistake buying the tubing from different manuafacturers
No worries man, i wasn't the only one with these issues as it seems fairly common for EK to not check this.. i have no idea how these even pass QC tbh. Like i mentioned, anyone who is fairly new to watercooling would just expect things to work straight out of the box and not leak like it did. To not tighten screws properly is a pretty basic mistake to make especially for a big company like EKWB. I don't ever remember EK making these mistakes when they first started out but it seems the bigger they get the more they miss. People will always defend them but personally mistakes like this is unforgiveable, could easily ruin someone's expensive hardware.

In your case, i'm glad you found the issue and i'm happy i helped out, it's one of the reasons why i keep everything i find in detail in case someone else comes across the same issues.
 
Back
Top Bottom