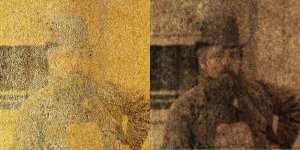
Help restoring a 145 year old photo

Soldato
OP
Joined
19 Jun 2009
Posts
3,874
Hi Donnie, once again thank you for producing those, i'll send these to person who's father was included in the original cricket club. I did already send him the original one you produced, and he was over the moon and incredibly grateful, he is going to have your corrected picture printed onto photo paper. When he first gave me the photo he presumed nothing could be done with it. For many many years the photo was hanging on a wall, and it had become bleached by the sun, sections of the photo had almost no detail remaining.

Mcnumplty2323, Yes I totally agree. When I held up the original picture next to the computer screen it's amazing the detail that's been recovered.

Thank you again, Jason
 
Associate
Joined
22 Jun 2018
Posts
1,583
Location
Doon the watah ... Scotland
Its the first photo I've ever restored like that. There were a couple of points that really brought the image quality forward, which if anyone is interested ( from getting here from google searches etc ), or I cant remember what I did later down the line, then here goes.

I found working with the coloured scans better than the non-coloured ones. Colour simply had more data to work with. In simplistic terms: grayscale only has a single value from 0-255, colour has 0-255 for red, green and blue ... so 3x times the data (potentially) to work with to bring out details. I wasn't bothered about the colour it looked working through it the process, as long as more detail came out.

1st big thing was getting rid of all the tiny tiny white spots that were all over the image ( not the big ones ). A lot of the spots were only 1 pixel wide and they were across the whole image. After a number of methods tried, to get rid of them, I:
- Created a duplicate layer of the image, one on top of the other.
- On that top layer, I did a selection by colour range (i.e. white, or just about white). This selected all the tiny white spots.
- Deleted that selection from the top layer so that where there was white spots on the top layer, it was now transparent to the layer below.

Trouble is that the layer below had all the white spots too, so you then saw all the white spots again. After a bit of messing around, I came up with the idea of blurring the bottom layer below. this meant that all the white spots got blurred into an average of the colours around them. So now, where the top layer was transparent from deleting all the white spots, what you got was a blended average filling in the white spot. Great benefit of this is that detail is never lost from the top layer as it didn't need blurred.

Time was then spent filling in the bigger white spots using content aware healing, clone tools etc, and also trying (with limited success) to remove the 2 dark vertical bands.

2nd big thing was the multiply mode of blending layers. Take the photo, duplicate it, and make set the top layer to Multiply. Too hard to explain how it works, but it basically brings out colour and detail that you just wouldn't get by adjusting brightness and contrasts alone. This step is what brought out the faces on people and the scores on the board.

Simples !

[Edit]

Here is a before and after. Best viewed at 100%. Looking at it now, even I can't believe how good it came out :)

FBpgUlR.jpg
 
Last edited:
Soldato
Joined
8 Nov 2002
Posts
4,365
Location
Kent
If you're expecting a restoration to reach something where there is no noise and grain, all the details back etc ... you're not going to get it. And even if you did, it just simply wouldn't look right. I went through a similar process with a few old photos of the farmhouse I live in. Long story short, the grain and noise adds to the final result looking better. Cant explain why, but they just seem to print out better and look better on the wall that way.

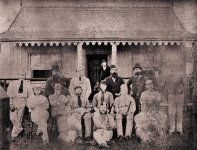
In terms of your photo, ditching the sepia goes a long way to removing the light faded section on the right. The 2 darker bands could be reduced a lot as well. You could also likely add some more detail through some smart use of dodge, burn and cloning tools.

So this was done by making it grayscale first, cloning sections of the roof against each other to even it out and remove the bands. Then some dodge and burn to reduce the banding across the team. Finally, a gradient map to give it back some colour afterwards. Its not perfect, but I was just playing about with the tools seeing what would and wouldn't work. It could be a lot better.
KEBASs3.jpg

The image you have uploaded isn't particularly large either. Can you upload a larger version which is unaltered?
Have you tried Ian denoise 2019 beta 3 found in g'mic plugin for gimp 2.10.20? It is pretty good at removing the grain and can do a comparison between the original and the degrained to pick up original detail. Ofcourse an 145 year old photo may well be best left grainy.

My exact settings for a grainy photo starting with denoiseAI 834153 lowlight on. G'mic Ian denoise 2019 filterwas then use to further reduce noise found when zoomed in / reclaim detail.

Gimp's built in Wavelet decompose can isolate frequencies of detail, and you can then use the ian denoise 2019 beta 3 on that.

I've got some good results with enlarging with gigapixel ai, reducing with irfanview, denoising that with denoiseAI (at higher final resolution), however that's more geared to batch processing for a video rather than a photograph.
 
Last edited:
Soldato
Joined
8 Nov 2002
Posts
4,365
Location
Kent
Its the first photo I've ever restored like that. There were a couple of points that really brought the image quality forward, which if anyone is interested ( from getting here from google searches etc ), or I cant remember what I did later down the line, then here goes.

I found working with the coloured scans better than the non-coloured ones. Colour simply had more data to work with. In simplistic terms: grayscale only has a single value from 0-255, colour has 0-255 for red, green and blue ... so 3x times the data (potentially) to work with to bring out details. I wasn't bothered about the colour it looked working through it the process, as long as more detail came out.

1st big thing was getting rid of all the tiny tiny white spots that were all over the image ( not the big ones ). A lot of the spots were only 1 pixel wide and they were across the whole image. After a number of methods tried, to get rid of them, I:
- Created a duplicate layer of the image, one on top of the other.
- On that top layer, I did a selection by colour range (i.e. white, or just about white). This selected all the tiny white spots.
- Deleted that selection from the top layer so that where there was white spots on the top layer, it was now transparent to the layer below.

Trouble is that the layer below had all the white spots too, so you then saw all the white spots again. After a bit of messing around, I came up with the idea of blurring the bottom layer below. this meant that all the white spots got blurred into an average of the colours around them. So now, where the top layer was transparent from deleting all the white spots, what you got was a blended average filling in the white spot. Great benefit of this is that detail is never lost from the top layer as it didn't need blurred.

Time was then spent filling in the bigger white spots using content aware healing, clone tools etc, and also trying (with limited success) to remove the 2 dark vertical bands.

2nd big thing was the multiply mode of blending layers. Take the photo, duplicate it, and make set the top layer to Multiply. Too hard to explain how it works, but it basically brings out colour and detail that you just wouldn't get by adjusting brightness and contrasts alone. This step is what brought out the faces on people and the scores on the board.

Simples !

[Edit]

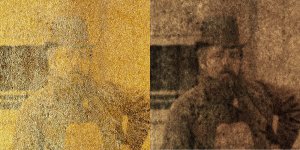
Here is a before and after. Best viewed at 100%. Looking at it now, even I can't believe how good it came out :)
FBpgUlR.jpg
Thanks for this information, this is sure to help me. I was here for encoding settings for Staxrip, AMD and deinterlacing (after looking for help on videohelpforums and youtube) but this info is a huge bonus.
 
Caporegime
Joined
29 Jul 2011
Posts
36,382
Location
In acme's chair.
I came into this thread when it was first posted thinking "Oh no, theres so much unrecoverable detail in that picture, how sad..."

And then Donnie knocked it out of the park. :p
 
Soldato
Joined
8 Nov 2002
Posts
4,365
Location
Kent
https://1drv.ms/u/s!AhCKpFOJjf6jgUZITZ-TnA6sANu9?e=g7feIX

I linked to some screenshots, two of the encoder settings for the G'mic plugin ian denoise 2019, one of the final upscale (x24 down to> 1440p).

One drive has scaled my high res jpeg so here it is again hosted on imgur:
https://imgur.com/gallery/wZyQPBr

I use wavelet decompose and denoise beta 3 overall but the sub filters on the 3 scales of pixel information were beta 3 and pixel denoise. I thought beta 3 looked better.

Result of G'mic
https://1drv.ms/u/s!AhCKpFOJjf6jgUkgWprOHxn2paqw?e=1QfLjs

Result of Denoise + GigapixelAI:

https://1drv.ms/u/s!AhCKpFOJjf6jgUx0BI7aRHG5NkV6?e=8PnOdh

I'm trying to get a smoother result without loss of detail, it might take a gausian blur, then reclaim the details with the beta 3 or by upscaling with gigapixalAI.
 
Last edited:
Back
Top Bottom