Soldato
- Joined
- 30 Sep 2005
- Posts
- 16,553
Hi Everyone,
I remember creating a guide a few years back for the Nest Thermostat, so figured I do a quick rundown of the Nest Hello I installed today. Very easy, nothing to be afraid of.
My original doorbell had actually broken, so I had to get a new one anyway.
The original one was a door chime and transformer all in one unit. Basically how they work is that you have a standard 240v feed coming in which gets converted to a lower voltage (in my case 6v). There are wires connecting the 6v feed to the chime with the doorbell in the middle acting as the switch. You press the doorbell, it completes the current and the chime rings.
Usually, this is fed from the lighting circuit, so turn it off at the fuse box.
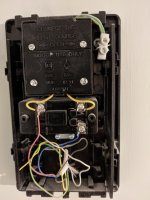
Here's a photo of the old chime.....it all got ripped out. Don't worry where the wires go, makes no difference.
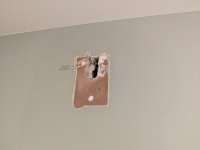
I filled in the holes, sanded and couple of coats of paint.
The nest requires 12v or 24v so you need to buy a transformer and a box to fit it in. Speaking to an electrician, it is recommended to wire it up at 24v as it's less load through the cable...which is pretty thin.
https://www.amazon.co.uk/gp/product/B07J2NWYC4/ref=ppx_yo_dt_b_asin_title_o01_s00?ie=UTF8&psc=1
https://www.amazon.co.uk/gp/product/9792114041/ref=ppx_yo_dt_b_asin_title_o01_s00?ie=UTF8&psc=1
Stick the incoming 240v (live+neutral) in the top, and the cable to the doorbell in 0v and 24v
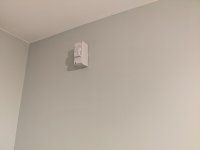
Then get a flat screwdriver and rip the old crappy doorbell out and screw in the new one. Doesn't matter which way round the wires go. Luckily I used the existing bottom hole, and made the top one bigger so I could push back the nest clips. I then made a new hole for the top screw.
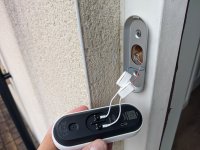
If you struggle to get the nest hello clipped in, you have probably screwed the plate in to tight. Loosen it at the bottom.
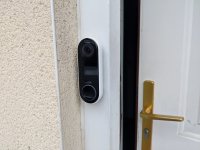
Next I flicked the power back on and got it setup in the app.
Spent the next hour mounting the Hub on the wall and threading the power cable through the wall to a mains socket on the other side.
I used this wall mount
https://www.amazon.co.uk/gp/product/B07SMNDLLK/ref=ppx_yo_dt_b_asin_title_o00_s00?ie=UTF8&psc=1
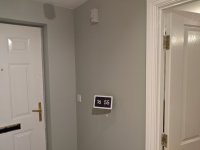
Just got a tiny bit of sanding and painting left but I'm happy with it
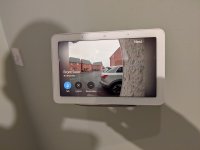
Having the Hub here is brilliant, as are the google minis dotted around the house acting as chimes.
I remember creating a guide a few years back for the Nest Thermostat, so figured I do a quick rundown of the Nest Hello I installed today. Very easy, nothing to be afraid of.
My original doorbell had actually broken, so I had to get a new one anyway.
The original one was a door chime and transformer all in one unit. Basically how they work is that you have a standard 240v feed coming in which gets converted to a lower voltage (in my case 6v). There are wires connecting the 6v feed to the chime with the doorbell in the middle acting as the switch. You press the doorbell, it completes the current and the chime rings.
Usually, this is fed from the lighting circuit, so turn it off at the fuse box.
Here's a photo of the old chime.....it all got ripped out. Don't worry where the wires go, makes no difference.


I filled in the holes, sanded and couple of coats of paint.
The nest requires 12v or 24v so you need to buy a transformer and a box to fit it in. Speaking to an electrician, it is recommended to wire it up at 24v as it's less load through the cable...which is pretty thin.
https://www.amazon.co.uk/gp/product/B07J2NWYC4/ref=ppx_yo_dt_b_asin_title_o01_s00?ie=UTF8&psc=1
https://www.amazon.co.uk/gp/product/9792114041/ref=ppx_yo_dt_b_asin_title_o01_s00?ie=UTF8&psc=1
Stick the incoming 240v (live+neutral) in the top, and the cable to the doorbell in 0v and 24v

Then get a flat screwdriver and rip the old crappy doorbell out and screw in the new one. Doesn't matter which way round the wires go. Luckily I used the existing bottom hole, and made the top one bigger so I could push back the nest clips. I then made a new hole for the top screw.

If you struggle to get the nest hello clipped in, you have probably screwed the plate in to tight. Loosen it at the bottom.

Next I flicked the power back on and got it setup in the app.
Spent the next hour mounting the Hub on the wall and threading the power cable through the wall to a mains socket on the other side.
I used this wall mount
https://www.amazon.co.uk/gp/product/B07SMNDLLK/ref=ppx_yo_dt_b_asin_title_o00_s00?ie=UTF8&psc=1

Just got a tiny bit of sanding and painting left but I'm happy with it

Having the Hub here is brilliant, as are the google minis dotted around the house acting as chimes.

